
Kanban Board View
The Kanban Board view displays your database as a visual board with drag-and-drop cards organized into columns. It's ideal for workflow management, project tracking, and visual task organization.
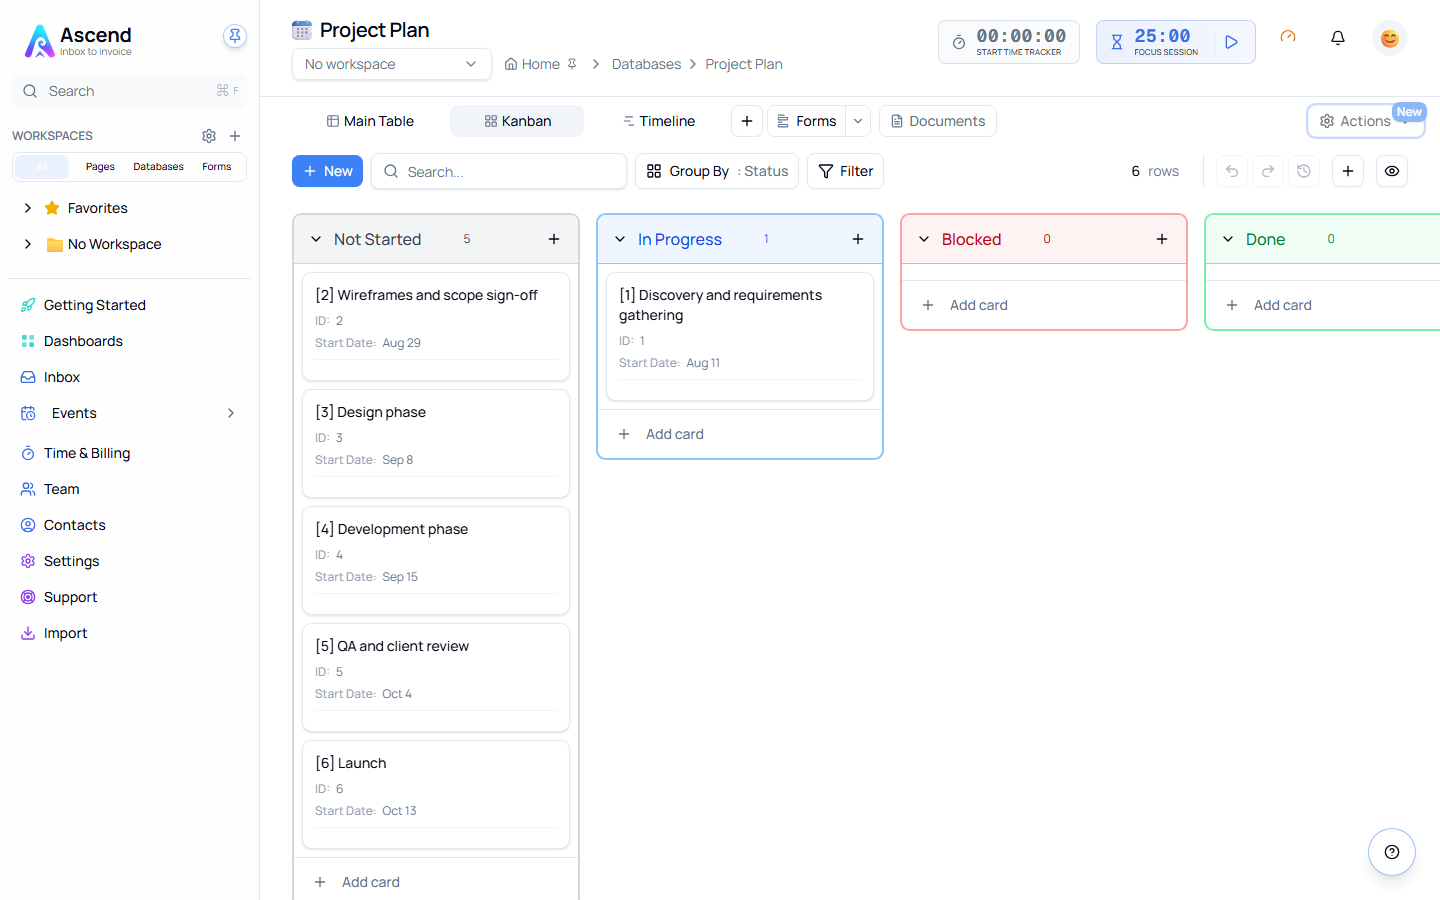
Creating a Kanban Board
- Click the "+" button next to existing view tabs
- Select "Board" from the view type options
- Choose a property to group by (creates your columns)
- The board is created with columns for each value
Best properties for Kanban:
- Status: Track workflow stages (To Do → In Progress → Done)
- Priority: Organize by importance (Low, Medium, High)
- Person: Assign work to team members
- Select/Multi-select: Custom categories
Understanding the Board Layout
Columns
Each column represents a value from your group-by property. For example, if grouping by Status:
- To Do column: All items with Status = "To Do"
- In Progress column: All items with Status = "In Progress"
- Done column: All items with Status = "Done"
Cards
Each card represents one database row. Cards show:
- The row title (primary property)
- Key properties for quick reference
- Comment count and communication indicators
Column Header
- Title: The column's value (e.g., "In Progress")
- Count badge: Shows "X of Y" when there are more cards available
- Add button (+): Quickly add a new card to this column
- Collapse button: Minimize the column to save space
Per-Column Pagination
Kanban boards use smart pagination to ensure all columns show their cards, even with large datasets.
How It Works
- Each column initially loads 10 cards
- A "Show more" button appears if there are additional cards
- Each click loads 10 more cards (up to 25 at a time)
- The count badge shows "X of Y" (e.g., "10 of 45")
Why Per-Column Pagination
Traditional pagination might load 50 rows total, but if most data is in one column (e.g., "Closed"), other columns might appear empty. Per-column pagination ensures:
- All columns show data: Each column fetches its own records
- Better performance: Only load what you need
- Accurate counts: See exactly how many items are in each column
Loading More Cards
- Scroll to the bottom of a column
- Click "Show more" to load additional cards
- The count updates (e.g., "20 of 45")
- Repeat until all cards are loaded
Working with Cards
Adding Cards
Quick Add:
- Click "+ Add card" at the bottom of a column
- Type the card title
- Press Enter or click Add
- Card is created with the column's value pre-filled
Full Add:
- Click "+ Add card"
- Add multiple properties via the quick add form
- Card opens for detailed editing if needed
Moving Cards (Drag & Drop)
- Click and hold a card
- Drag to another column
- Drop to update the card's group-by property
- Example: Drag from "To Do" to "In Progress" updates Status
Tip: Dropping a card updates the underlying data immediately.
Reordering Cards
- Drag cards within the same column to reorder
- Order is preserved when you return to the view
Opening Card Details
- Click any card to open the row detail panel
- Edit all properties, add notes, view history
- Changes sync automatically
Deleting Cards
- Hover over the card
- Click the menu icon (⋮)
- Select "Delete"
- Confirm deletion
Changing the Group By Property
- Click the "Group" button in the toolbar (left of Filter)
- Select a different property from the dropdown
- The board reorganizes with new columns
Groupable property types:
- Select / Multi-select
- Status
- Person
- Checkbox (creates "Checked" / "Unchecked" columns)
- Date (groups by date ranges)
Column Management
Collapsing Columns
- Click the collapse icon in the column header
- Column minimizes to save screen space
- Click again to expand
Showing/Hiding Empty Columns
- Click the "Group" button
- Toggle "Show empty columns"
- Empty columns appear or hide accordingly
Renaming Columns (for Select/Status)
- Click the column title
- Type the new name
- Press Enter
- This updates the option throughout your database
Reordering Columns
- Drag a column header left or right
- The underlying option order is updated
- Affects the property's option order everywhere
Filtering and Sorting
Filtering the Board
Filters work the same as in table view:
- Click the "Filter" button
- Add filter conditions
- Only matching cards appear in columns
Example: Filter by "Assigned to Me" to see only your cards.
Sorting Within Columns
- Click the "Sort" button
- Select a property and direction
- Cards within each column are sorted
Example: Sort by Due Date (ascending) to see urgent items first.
Searching
- Use the search bar to find specific cards
- Results filter across all columns in real-time
Best Practices
Workflow Design
✅ Do:
- Use Status for primary workflow stages
- Limit to 5-7 columns for clarity
- Define clear "done" criteria for each column
- Use colors to visually distinguish columns
❌ Don't:
- Create too many columns
- Use vague column names
- Leave cards in "In Progress" indefinitely
Performance Tips
- Use filters to reduce visible cards
- Collapse columns you're not actively using
- Take advantage of per-column pagination for large datasets
Team Collaboration
- Assign cards to specific team members
- Use comments for discussion on cards
- Review "blocked" items regularly
- Track cycle time (how long cards stay in each column)
Troubleshooting
Cards not showing?
- Check your filters
- Click "Show more" if the column has pagination
- Ensure the group-by property has the correct value
Can't drag cards?
- The view might be read-only
- Check if you have edit permissions
- Ensure drag-and-drop isn't disabled by a sort
Column order changed unexpectedly?
- Dragging columns reorders the underlying options
- This affects all views using that property
"Show more" button not working?
- Check your internet connection
- Wait for the loading indicator to complete
- Refresh if issues persist
Related
- Views, Filters & Sorting - Complete view system guide
- Property Types - Understanding groupable properties
- Working with Rows - Managing database records