
Creating Pages
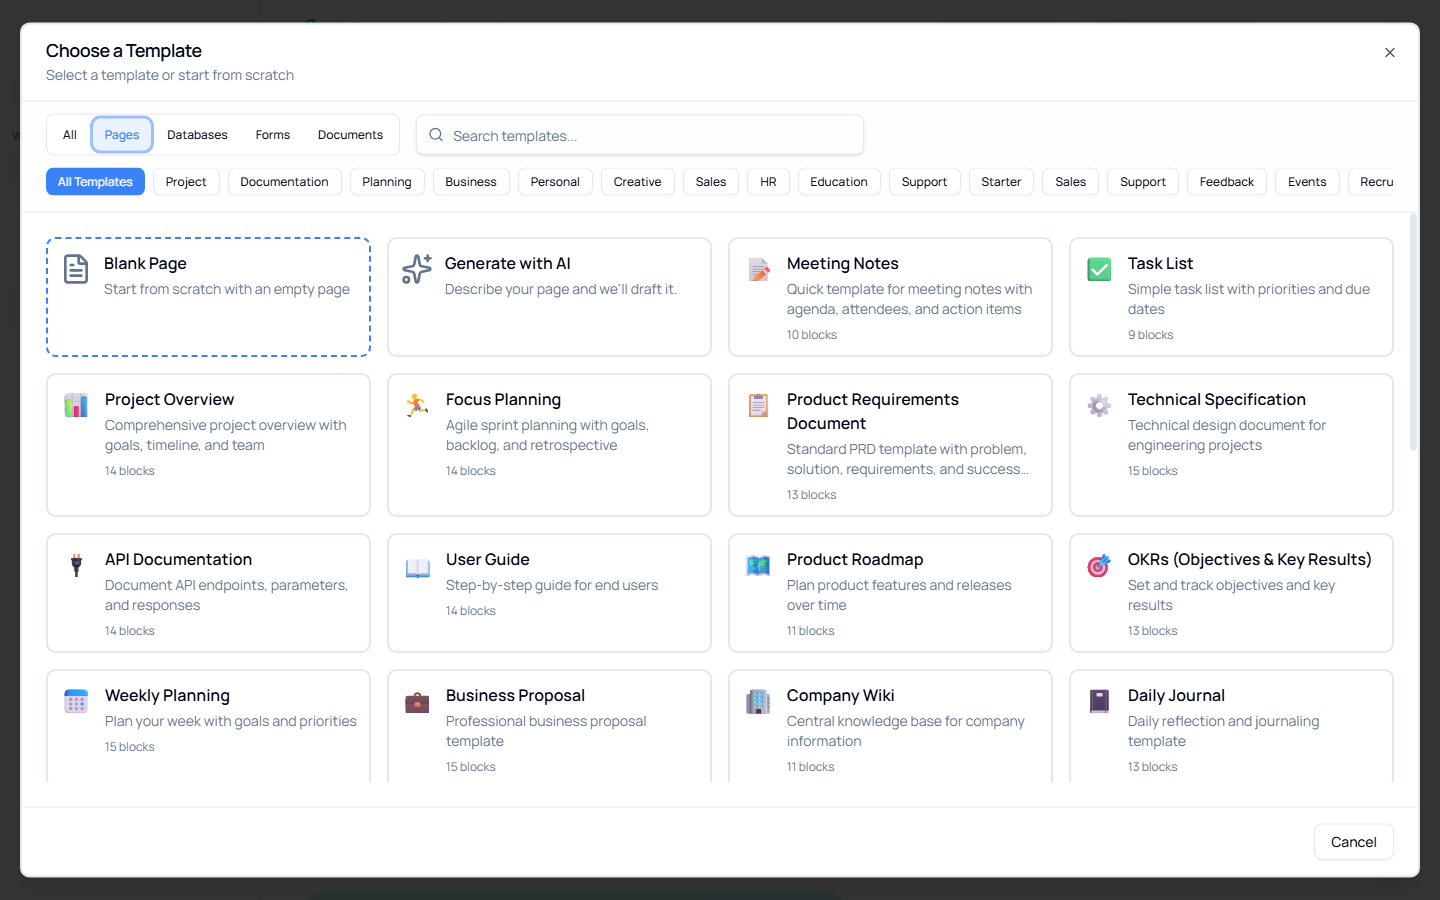
Creating a New Page
Basic Creation
- Navigate to Pages from the sidebar or dashboard
- Click the "New Page" button
- Choose a template or select "Blank Page"
- Enter a page title
- Select a workspace (optional)
- Choose a parent page (optional)
- Click "Create Page"
The page opens immediately with focus in the title field, ready for you to start typing.
Using Templates
Templates provide pre-built page structures for common use cases.
Available Template Categories
Project Management:
- Project Plan
- Sprint Planning
- Roadmap
- Meeting Notes
- Retrospective
Business:
- Product Requirements (PRD)
- Business Plan
- Marketing Plan
- Sales Proposal
- Budget Template
Personal:
- Daily Journal
- Goal Setting
- Book Notes
- Recipe
- Travel Planner
Technical:
- Technical Documentation
- API Documentation
- System Design
- Bug Report
- Release Notes
And many more!
Using a Template
- Click "New Page"
- Browse templates by category
- Click a template to preview
- Click "Use Template"
- Customize the title and settings
- Click "Create Page"
The page is created with the template structure. Simply fill in or modify the sections.
Customizing Templates
After creating from a template:
- Delete sections you don't need
- Add new blocks as needed
- Rearrange sections by dragging
- Save as your own template (if feature is available)
Organizing Pages
Workspaces
Workspaces help organize pages by project, client, or category.
When Creating:
- In the create dialog, find the "Workspace" dropdown
- Select your desired workspace
- Or choose "No workspace"
For Existing Pages:
- Open the page
- Find the workspace selector (below title, left of tags)
- Click to change workspace
- Changes save instantly
Benefits:
- Filter pages by workspace
- Keep projects separate
- Easy context switching
- Team organization
Parent Pages (Page Tree)
Create hierarchical structure by nesting pages under parent pages.
When Creating:
- In the create dialog, find "Parent page" dropdown
- Select a parent page
- Or leave as "Root" for top-level page
After Creation:
- The page appears under its parent in the tree
- Creates logical organization
- Useful for documentation, projects, and knowledge bases
Example Structure:
📁 Product Documentation
  ├── 📄 Getting Started
  ├── 📄 Installation
  ├── 📁 Features
  │   ├── 📄 Feature A
  │   ├── 📄 Feature B
  │   └── 📄 Feature C
  └── 📄 Troubleshooting
Moving Pages:
- Drag and drop in the page tree
- Or edit the parent in page settings
- Changes reflect immediately
Tags
Add tags for flexible categorization across workspaces.
Adding Tags:
- Open the page
- Find the tags area (below title, right of workspace)
- Click "Add tag"
- Type tag name or select existing
- Press Enter
Using Tags:
- Filter pages by tag
- Cross-workspace categorization
- Multiple tags per page
- Color-coded for visual scanning
Example Tags:
- #urgent
- #in-progress
- #needs-review
- #archived
- #client-facing
Page Settings
Title
Editing:
- Click the title to edit
- Changes save automatically
- Appears in page lists and search
Best Practices:
- Keep titles concise but descriptive
- Use consistent naming conventions
- Avoid special characters
- Make it searchable
Icon
Add an emoji or icon to your page for visual identification.
Adding an Icon:
- Hover over the page title area
- Click "Add icon"
- Search for an emoji
- Click to select
Changing Icon:
- Click the existing icon
- Choose a new one
Removing Icon:
- Click the icon
- Select "Remove icon"
Cover Image
Add a cover image to make your page visually appealing.
Adding a Cover:
- Hover over the top of the page
- Click "Add cover"
- Choose from:
- Upload image
- Unsplash (if available)
- Solid color
- Gradient
Repositioning:
- Click the cover
- Drag to reposition
- Click "Reposition" for fine control
Removing Cover:
- Hover over cover
- Click "Remove cover"
Duplicating Pages
Create a copy of an existing page with all its content.
Method 1: Page Menu
- Open the page
- Click the "..." menu
- Select "Duplicate"
- A copy is created with "(Copy)" appended
Method 2: Page List
- Right-click a page in the list
- Select "Duplicate"
What Gets Copied:
- All blocks and content
- Page structure
- Icon and cover
- Tags (optionally)
What Doesn't Get Copied:
- Comments
- Activity history
- Share settings
Use Cases:
- Create recurring meeting notes
- Reuse project templates
- Start from a similar page
Deleting Pages
Deleting a Page
Method 1: Page Menu
- Open the page
- Click the "..." menu
- Select "Delete"
- Confirm deletion
Method 2: Page List
- Right-click a page in the list
- Select "Delete"
- Confirm deletion
Warning: Deleted pages cannot be recovered! Make sure you want to delete before confirming.
What Happens to Child Pages?
When you delete a parent page:
- Child pages are NOT deleted
- They move up one level in the hierarchy
- Or become root-level pages
Finding and Opening Pages
From Page List
Grid View:
- Visual cards with icons and previews
- Click any card to open
List View:
- Compact rows with title and metadata
- Click any row to open
Toggle Views:
- Click the grid/list icon in the toolbar
From Page Tree
- Expand the sidebar
- Navigate the tree structure
- Click any page to open
- Expand/collapse folders with arrows
From Search
- Press Cmd/Ctrl + K for global search
- Type page name
- Select from results
- Page opens immediately
From Workspace
- Click a workspace in the sidebar
- See all pages in that workspace
- Click to open
Recent Pages
Access recently viewed pages:
- Look for "Recent" section
- Click any recent page
- Quick access to your work
Filtering Pages
By Workspace
- Click the Workspace dropdown in toolbar
- Select a workspace
- Only pages in that workspace are shown
By Tags
- Click the Tags filter in toolbar
- Select one or more tags
- Pages with those tags are shown
By Search
- Use the search bar at the top
- Type to filter by title
- Works with current filters
Sorting Pages
Sort pages by:
- Title (A-Z or Z-A)
- Created Date (newest or oldest first)
- Updated Date (recently edited first)
- Custom (manual order in tree)
Best Practices
Naming Pages
✅ Do:
- Use clear, descriptive titles
- Include dates for recurring items ("Weekly Sync - Dec 28")
- Use consistent naming conventions
- Make titles searchable
❌ Don't:
- Use vague titles ("Notes", "Meeting")
- Use only dates without context
- Use special characters excessively
- Make titles too long
Organizing Pages
Use Workspaces for:
- Projects
- Clients
- Departments
- Major categories
Use Page Tree for:
- Documentation hierarchy
- Project sub-pages
- Topic organization
- Related content
Use Tags for:
- Status (#in-progress, #done)
- Priority (#urgent, #low-priority)
- Type (#meeting-notes, #documentation)
- Cross-cutting concerns
Template Strategy
- Start with templates for common formats
- Customize to fit your needs
- Duplicate successful pages as templates
- Share useful templates with team
Common Workflows
Weekly Meeting Notes
- Create from "Meeting Notes" template
- Add date to title: "Team Sync - Dec 28, 2024"
- Place under "Meetings" parent page
- Tag with #meeting-notes
- Fill in attendees and agenda
- Add action items as todo blocks
Project Documentation
- Create parent page: "Project Alpha"
- Add icon and cover
- Create child pages:
- Overview
- Requirements
- Design
- Implementation
- Testing
- Link pages together
- Tag all with #project-alpha
Personal Knowledge Base
- Create workspace: "Personal"
- Create topic pages (Learning, Ideas, etc.)
- Nest specific pages under topics
- Use tags for themes
- Link related pages
- Regular review and cleanup
Troubleshooting
Can't create a page?
Check:
- You have permission to create pages
- You're signed in
- Workspace allows page creation
Page not appearing?
Check:
- Workspace filter
- Tag filter
- Search filter
- Check "All Workspaces" view
Can't find parent page?
Solution:
- Search for the parent
- Verify it still exists
- Choose "Root" if unsure
Template not loading?
Solution:
- Refresh the page
- Try a different template
- Start with blank page
Related
- Blocks - Adding content to your pages
- Editing & Formatting - Text formatting and shortcuts
- Page Features - Icons, covers, and metadata
- Organization - Page tree and structure